I’m going to start this post with a question – have you ever written an iPhone application?
I’m hoping the answer to the first question is a yes. If it is, answer this, did you use one of those really handy XCode templates for a view based application?
I’m going to be rude here and second guess your answer – yes you did!
You are after all a software developer, your cherish re-use and hate boilerplate code. Letting XCode churn out all that hideously dull setup code is a no brainer. And indeed I’ll freely admit to have created hundreds of ‘View Based Applications‘ and never stopped to consider what voodoo magic XCode up-to behind the scenes. And I was perfectly happy to do so, until one day (today) I stopped and decided that I needed enlightened. So let me take you on a journey, a journey of View Based Initialization and how an iPhone application is born….
In The Begining – there was main()
Well, where else would we begin! Every template based iPhone application will contain a main.m file with a simple implementation of main which usually contains 4 lines, of most importance is the following…
int retVal = UIApplicationMain(argc, argv, nil, nil);
The first two arguments (argc and argv) are the arguments passed from the OS to your application this would include the path on the device’s file system to your executable. The 3rd and fourth arguments are of more interest here. They represent an instance of UIApplication and UIApplicationDelegate that will effectively control your application.
Your UIApplication is a singleton object that represents the root object of your application hierarchy. It will control the top level window, its hierarchy of subviews, receive application lifecycle events (termination, minimizing, memory warnings etc). Why then is it nil? The ApplicationMain method is clever, it if the UIApplication is nil it will look in your projects ApplicationName-plist.info file (it’s under the Resources folder) for a property called “Main nib file base name” (a.k.a. NSMainNibFile). The value for this property will the be MainWindow xib file that XCode created for you (it’s under your project’s Resources folder too).
This is our hook into the world of xibs and Interface Builder…
… And Then Came Xibs…
So, UIApplication is handed a xib, but what does it do with it!?
Well a xib file is simply a serialized set of objects (views, controllers, controls etc.) arranged in some sort of hierarchy. If you’re really keen have a look at the xib file in a text editor, it’s plain old XML. Here’s a sample of my MainWindow.xib just to prove the point…
<object id="774585933">
    <reference key="NSNextResponder"/>
    <int key="NSvFlags">274</int>
    <string key="NSFrameSize">{320, 460}</string>
    <reference key="NSSuperview"/>
    <object key="IBUIBackgroundColor">
        <int key="NSColorSpace">3</int>
        <bytes key="NSWhite">MC43NQA</bytes>
        <object key="NSCustomColorSpace">
        <int key="NSID">2</int>
    </object>
</object>
… that’s enough of that!
UIApplicationMain takes your MainWindow and recreates the objects defined within it, which for a view based application looks something similar to this picture…
… Which Contained Proxies and Delegates …
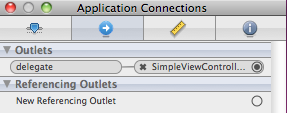
Focus on the File’s Owner object for now. A File’s Owner entry in a xib is a placeholder for a reference to the object that loaded the xib file at runtime. In our case UIApplicationMain will have created a UIApplication instance (remember we didn’t specify a subclass) and instructed it to load the xib file – hence the type of our File’s Owner is a UIApplication. The File’s Owner can be a bit confusing to grasp, but I like to think of it as simply a bridge between the running application and the newly hydrated objects. Giving XCode the type is a way of helping you define the communication mechanism between the existing application and these new objects. In the case of my View Based Application we need some way of hooking up the UIApplication instance created for us to the UIApplicationDelegate created by XCode. By telling XCode that our File’s Owner will be a UIApplication we can subsequently set the UIApplication instance’s delegate property to our project’s delegate class….
The Delegate (SimpleViewControllerAppDelegate in the above picture) conforms to the UIApplicationDelegate method and handles application lifecycle events from the main application.
… And A GUI Too …
Now for the fun part, the GUI! So far we have a UIApplication which has been pointed towards our custom delegate that XCode created for us. If we refer back to the contents of the MainWindow xib we’ll see two other interesting objects of type UIWindow and UIViewController (in my case they’re named Window and SimpleViewControllerViewController). In iOs there is a concept of windows and views, where a window contains a number of views – typically we only have one window per view. In this case we have a single UIWindow which will have a reference to the UIView managed by the SimpleViewControllerViewController.
… And With a Bit of Magic …
So now we have an application with a delegate and a GUI. But how do we get the application to display the GUI?
Another look at our xib file gives us the answer…
- (BOOL)application:(UIApplication *)application didFinishLaunchingWithOptions:(NSDictionary *)launchOptions {
    [self.window addSubview:viewController.view];
    [self.window makeKeyAndVisible];
    return YES;
}
As I’ve discussed earlier the delegate is responsible for responding to application lifecycle events, of which didFinishLaunching is one. Upon UIApplicationMain finishing hooking up our MainWindow xib it will invoke this delegate method, which in turn takes our UIWindow and adds to it our UIViewController’s managed view.
The second line symbolises the end of our journey to enlightenment. The makeKeyAndVisible method of UIWindow sets our window instance to be our UIApplication’s main window and prepares it to be drawn on screen.
If you’ve got this far I hope you’re beginning to feel enlightened. I’d strongly suggest you continue your path to enlightenment and create a new template project and study its wiring. A good understanding of this process will save you many hours of pain in the future*
* I speak from experience 🙂


